The fanny pack is the universal sign that A) You just emerged from your mom’s basement because you’re out of cheetos, or B) You’re man enough to recognize the utility and comfort of a bag worn about the waist. I happen to be a combination of both.
If I weren’t married, I 100% would rock the fanny pack more often. As it stands, it is my dog walk, yard work, ruck walk, occasional around the house, and (if I’m not with my wife) grocery store companion. I think it’s a sign of maturity. At least that’s what I tell myself.
No Ragrets.
My fanny pack serves as a holster, mag pouch, and trauma kit when I’m out and about.
My cover story is it contains my insulin and blood sugar monitor. Pick a story that works for you. Especially if you wear it in a gym or somewhere where it could draw more than passing interest.
Set Up
My well loved Maxpedition Octa
My fanny pack is the Maxpedition Octa Versipack. While it’s not a purpose built gun bag, it holds a glock 19 easily in the main compartment. If you have a striker fired gun, consider a trigger guard holster like the MIC for protecting that trigger. Tie that holster through a grommet hole so it tears away when you draw. You should also consider cutting away all internal mesh/dividers in the intended gun compartment. No obstructions, nothing to hang on.
The front pockets can carry spare mag, a small LED light, TQ’s, dog poop bags, etc.
Only keep the pistol in the main pouch, with nothing else in that segment of the bag. It has 2 zipper pulls on the main pouch. I removed one, and on the other I hung a longer segment of green paracord as a pull. Consider also a bead or woven pull tab so you can distinguish the gun zipper from the others without looking.
That’s it. Are you man (or woman) enough to rock a fanny pack?
Here’s photos of the VERY GOOD KG Products BeltBag. I took mine to the range recently and put myself on the timer with it. I was working draws and 1,2, or 3 shots on a 6″ circle at 5 yards. I was getting draw times from 2.5 to 3.0 seconds (concealed from holster puts me at 1.5 seconds or so from beep to first shot). If I were buying a new one, I’d definitely get a KG Products.
Bag is not too wide, has good space to hold IPhone, Keys, Wallet, and some small med stuff.
Snap in corner keeps the weight off of hook and loop for longevity
Bag opens more in the Left-Right direction than the Up-Down direction.
Shown with PX4 which is approximately G19 size. No issues with drawing.
I don’t think it’s any real revelation to say that the most important skill in defensive shooting is the first shot from the holster. Every story you will read about an armed citizen using their gun in a shooting has one thing in common… They had to get their gun out and shoot! After the first shot rings out, the shooting problem becomes much more complicated. Shooting skills such as shooting on the move, shooting multiple targets, reloading, malfunction work, grappling in a weapons based environment, retention shooting, and a hundred others are all important. However, they all require you to already have the gun in your hand. Taking this into consideration, I spend a significant amount of time (both live and dryfire) practicing what I consider to be the most important skill in shooting. I am currently working on making this faster, more accurate, and more repeatable. I’m going to list my approach but please understand that I’m open for suggestions and ways to improve.
What are the components of a rapid first hit?
Clearing the cover garment. Ideally you will chose a way that works regardless of clothing choices and time of year. I do a ‘Hackathorn Rip‘ which essentially is grabbing as much jacket/shirt material as I can with my left hand, ripping it as high as I can get it, keeping my left hand high on my pectoral muscle, while establishing a full firing grip on the gun with the right hand. If you go to that link, you’ll see there’s like 12 jillion ways to clear your cover garment. In the interest of not having to remember what season it is, and whether my jacket is unzipped, I decided to just pull all that crap out of the way and get my gun. This might slow me down a bit, but I’m OK with that for the sake of robustness (H/T Gomez). It’s better than leaving some shirt material in the way to foul my draw. I like this method because the left hand is holding the shirt material and waiting for the gun hand to pass through the horizontal line of presentation so it can mate with the right hand.
Doing a perfect draw-stroke. I have made the conscious decision in my practice to forgo a competition draw stroke in which the gun goes in a straight line from holster to full extension (shortest distance). I have been working with a universal draw-stroke with a built in retention position, as well as the ability to stop along the horizontal line of presentation to shoot, depending on the proximity of the threat. This approach makes the most sense to me analytically, and I’ve experienced the usefulness during force on force evolutions in ECQC and in our training group. I understand that in order to shave significant time off of my draw-stroke, I may have to modify the path of my draw-stroke to a more direct line a la Ron Avery. I haven’t decided if that’s worth it or not.
Begin refining the sight picture and prepping the trigger as the gun presses out to full extension. Bring the gun to your eye, not the other way around. I keep my muzzle horizontal under my dominant eye throughout the draw, and the gun never goes lower than it was an instant before. I get the gun into my eye-target line as quickly as possible, and begin touching the trigger as the slide and sights become visible in the lower portion of my peripheral vision. The idea is that as the gun approaches full extension, the sight picture is refined and the trigger has a few pounds of pressure on it. The shot will break just as the gun reaches full extension and you’ll put the shot exactly where it needed to go. An alternative to this method is one taught by Todd Green of www.pistol-training.com where the gun is angled slightly up as the gun is brought from the holster and the front sight is slightly higher than the rear. As you present the gun, the front sight is driven straight towards the target as the rear sight is brought up to meet it. This method is nice when searching with a gun in your hand in an averted muzzle ready position, where you keep the gun angled up while looking past the front sight post as you move. I have given time to both methods, though I’ve never been formally instructed in TLG’s method. Here’s a clip of Gomez discussing some of these points. The relevant video starts at 2:30 or so.
Seeing what you need to see to make a good shot. There are countless books and videos about this, but in a nutshell it’s about only taking as much time as you need to take to make the shot you need to make. Perfecting this comes with experience, coaching, and lots of practice. It’s the part I struggle with the most. A torso shot at 4 yards and an eyeball shot at 15 yards require different levels of refinement of both sight picture, as well as trigger control.
Don’t be a spaz. Moving ‘faster’ doesn’t necessarily allow you to make a faster shot. For me, it just makes my sights bounce around a lot more and takes me time to correct them at the last instant. Like Avery says in that video above, trimming the wasted movement seems to go a long way in improving speed.
How do I get better?
Step one, find a reputable instructor who teaches this sort of thing. Learn the correct way to do it, then take it back home and practice practice practice. You should also have a timer. Use either a proper shot timer, or download a shot timer for your smart phone. You’ll want to use it for par times and eventually capture actual times that you can use to carve away wasted movement. Get video of yourself shooting. Looking at yourself is different than just concentrating on how your movement feels. You might see something really stupid that you can’t feel yourself doing.
What drills can I shoot?
I’m using these two live fire drills currently:
Press Six – This drill uses progressively shortening time standards, and increases the round count. It will force you to get hits quickly and test your follow through and grip when making the multiple shot strings. I’ve started at 3 yards, and follow the instructions on the drill for when to move the target further away.
3-two-1 – This drill forces you to ‘see what you need to see’ to make shots on a given target sizes. I’m hoping this one will help me improve breaking shots more quickly when the target is larger, and keep me honest on sights and trigger for lower probability targets.
I’m doing the following in my dry fire practice:
Target is a scaled down torso with aiming spot on the high center chest. Distance varies but I try to simulate between 3 and 15 yards with the reduced size target. Please follow safe dry-fire practices and don’t put a hole through your TV.
20 – perfect and deliberate draws with trigger press. Take your time and do everything how you want to do it.
20 – 3/4 speed draws with trigger press.
15 – full speed draws with trigger press. Occasionally I’ll use a par timer and set it for 1.5 to 2 seconds. I am concentrating on finding the front sight and having the shot break as I reach full extension. This requires some honesty with myself and occasionally a video camera. Video doesn’t lie.
5- perfect and deliberate draws with trigger press. I finish with a perfect mechanics.
“The Draw Stroke is the Draw Stroke is the Draw Stroke.”
-Paul Gomez explaining the drawstroke from several unorthodox positions
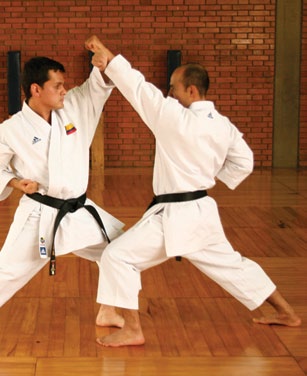
Paul Gomez, the personal protection integrator who passed away well before this time, once said that simple phrase that has stuck with me ever since. He was good about quips that you would have to contemplate and reflect on. At the time, the realities of self-defense and ‘The Fight’ were starting to become clearer to me. I realized that if I had to use my gun, I wouldn’t be slapping iron at noon in a dusty street while the town folk were watching from the front of the saloon (Insert your own personal gunfight fantasy).
Skin that Smoke wagon!
Upon watching and reading about the dynamics, lighting conditions, circumstances, terrain, distances, number of criminals, and locations in defensive shootings (gun fights, or gun battles) there was only one thing that was consistent. This is that the good guy didn’t get to choose when it went down. We, as the reactionary party, are attacked when it’s the worst possible time for us, and the best possible time for them.
As I wrote about in practice by the odds, a person should spend most of their time/resource constrained practice time working the most likely needed skill sets and streamline their mechanics to cover the widest set of circumstances one possibly can.
Your gunfight (hopefully we get lucky enough to make it a shooting instead) might be at thirty feet in a parking deck, at arms range in bank, in the hallway outside of your child’s room, in the front seat of your car, or on your back next to an ATM. So how can we as responsible and thinking gun owners, try to account for as MANY of these scenarios as possible with one set of mechanics for getting our gun into play? We can’t try to do something different for each scenario and have a different way to get the gun into play for each one. The decision tree quickly branches into an unmanageable (and slow) pile of options. The method of ‘if this, then this’ is why certain martial arts fall apart under pressure.
When I punch like this, you block like that… No higher.. a little left… OK perfect.
So we need a draw stroke that works within as many of the scenarios as we can imagine. We need an ‘if anything happens, you only need this one movement’ type of thing. Luckily for me, there are guys like Gomez, Craig Douglas, Greg Ellifritz, Cecil Burch, Chris Fry, James Yeager, Paul Sharp, Larry Lindenman, Aaron Little, and all of the gentlemen and scholars that teach a robust universal draw stroke and it’s integration into a self defense program.
The universal draw-stroke is so useful because with one mechanic we can handle probably 99% of all scenarios that one could imagine. It works while standing, lying, seated, while grappling, in a competition, from appendix or behind the hip, in a retention position, whatever you’ve got.
The Steps
Clear obstructions which could foul building a full (fuckin’) firing grip. This one can be deceptively complicated. In the simplest case with an open top holster in a shooting range, you can actually skip this step completely. Slightly more complicated might be breaking holster retention devices or clearing concealment garments. If seated, you might have to clear garments and a seat belt. If you’re in a fouled up tangle (gun grapple) of arms and legs, it might mean doing an arm drag and controlling the nearest arm to the gun. This step has the most depth of any of the parts of the draw-stroke. You can go deep deep deep into training all the complications that this one step can cause.
Establish a full firing grip. Building the grip with all of the proper index points is key. This is the first, and probably last time in your fight that you’ll have to build a good grip. Get a lot of practice and make it count.
Begin an efficient (no wasted movement) draw in which the gun is never lower than it was a moment before. Keep your elbows from tracking away from your torso. Being in proximity to non-involved parties that you don’t want to hang up on while drawing and opening holes between your arms and your torso for the bad guy to control your arms being the primary reasons.
Move to an indexed position of retention. This is important because you may need to shoot with someone in contact with you, swinging a pipewrench, or otherwise in your intimate space. If you need to shoot from here, you can stop your draw and begin shooting.
Move the gun to a horizontal position under the dominant eye. Your hands can come together at this point. Or for one handed shooting, you can begin pressing the gun out to full extension. While the gun is coming out, you should be bringing the gun into the eye-target line as quickly as possible. This gives you time to refine your sight picture as you are reaching full extension, which will allow you to start shooting quicker.
Example Photos:
Gun behind the hip.With ‘appendix’ carry, the retention position is a small diversion from the straight line draw. It’s easy to fall into the retention position as needed, however. My body is a bit more bladed than I intended in that photo. Ideally, I’d be more square to the target.Clear seat-belt, clear garment, draw as needed.GroundedStanding grapple
In Closing
I think spending the time to drill and ingrain this draw-stroke is time well spent. Having the framework to shoot from different positions without having to think about the mechanics is crucial. You’ll have enough other things to think about. When learning this draw, you should seek training under a watchful eye so you learn all the nuance involved. When you’re drilling and learning this draw, strive for perfect repetitions. Try to hit all of the index points so you will have the kinestetic awareness of how your body feels and where it is in space. I would pause at each way point along the way, imagining myself as a robot moving perfectly.
What you’ll probably find is that when you’re going for supreme speed in a competition or when you know you’re shooting at distance, the sharp corners of your draw will ’round’ and you’ll move in a more direct path to the target. That’s OK. You’re a thinking being and you will know when it’s appropriate. Having a framework to fall back on is what matters here. One Draw Stroke to rule them all… or something.
Getting Training
Here’s a list, in no particular order, of some trainers who can teach you this stuff:
Our 2,000 pound bullet (car) has failed us. We didn’t have the car on, we weren’t in drive, or we find ourselves in a circumstance that otherwise prevents our escape. To make it more dire, we have our little one with us. We have no other option but to ‘skin our smoke wagon’ and fight.
The Mission: Safely deploy our pistol from the buckled and seated position and allow ourselves to escape the car quickly and without being entangled with the car.
Here’s some relevant things to know about shooting in a car:
It’s loud. Like, way louder than you’re expecting. You’ll probably be sorry that you had to shoot from inside the car.
Going from inside the car through the windshield, bullets will tend to deflect upward. Depending on the weight of your bullets, as much as 3 inches at 7 yards or so. Google around and you can find some test data through windshields.
The trick to getting good hits through glass is to start shooting at a target, and keep shooting through the same hole. You make your own tunnel through the glass.
The 4 firearms safety rules still apply. You can usually get away with breaking one rule at a time, but any more than that can get you into trouble quickly. Like James Yeager says, “shooting yourself in a gunfight still counts”.
Cars are bullet magnets. If I have the little one with me, I will be leaving the car as quickly as possible to keep the heat away from the kid. We have to have the means to get out quickly and without injuring ourselves.
It might not be the best TACTIC to start a slug-fest gun fight at 2 feet. Everyone loses at these ranges. You may have to feign compliance or wait for your chance. Know your capabilities and limitations. The Way to learn this is through honest self evaluation and training.
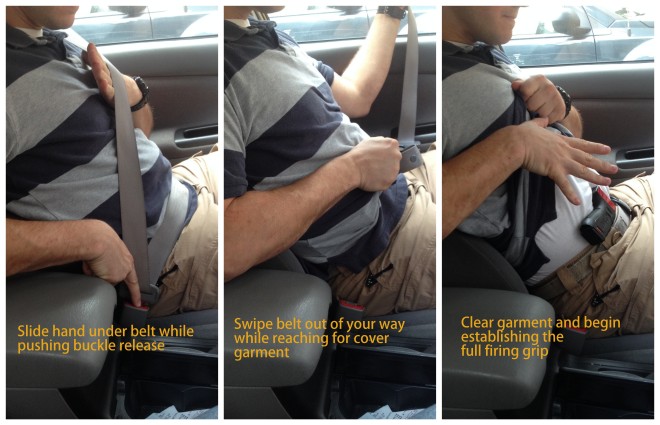
Take the time to unbuckle your seat belt. There is nothing more unbecoming than being caught in your seat belt during a gunfight.
How Embarrassing!
The Draw-stroke:
To clear the seat belt do a similar movement as you would do if you were just drawing your gun. Slide your left hand under the strap by your shoulder while your buckle hand disengages the latch. Use the hand under the strap to swipe the belt away. You now have access to your gun and can freely leave the car.
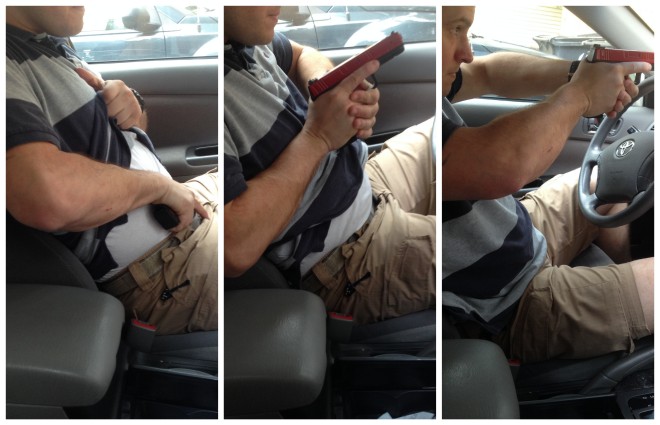
Repeat the general motions from step one to get your gun into play. Reach down and rip the cover garment away with one or both hands and hold it clear with the left hand. Establish grip with the right. Begin your draw-stroke. There are distinct advantages to drawing from the appendix (1 o’clock) position from inside a car. The direct line from holster to targets is helpful.
The 4 o’clock draw is similar. You can either pull yourself forward on the steering wheel (which I did in the photos), or you can use your right foot to stomp on the floorboard to lighten your gun side and pivot your hips to make space to access the gun. Keep your muzzle discipline extra strict and your draw-stroke compact. There are lots of objects and no-shoots that you can easily cover with the muzzle during this process.
Pivot directions in the car. You’ll notice you’re shooting in non-ideal and contorted shooting positions. To your left you’ll be in an almost Center Axis Relock position. Straight ahead and you’ll be in a compressed extension. To the right you might end up in a one handed shooting situation. Just remember ‘Sights and Trigger’ and don’t sweat the details.
When it’s time to leave, just stay compact with your gun and keep your muzzle averted. Post your foot on the door as it opens and use your leg to post and prevent it from bouncing back against your shins.
In future posts, I’ll share some ways I practice this in the comfort of my own home during dry fire. I’ll also share some ways you can practice this at a range even if you don’t have a car you can shoot through.
This isn’t the only way, it’s just a way. Keep that in mind and think through it for yourself.
Once again, I owe a lot of this info to all of the great instructors I’ve had the chance to train with. The vehicle tidbits come primarily from Craig Douglas of http://shivworks.com/ and James Yeager of http://www.tacticalresponse.com/.


